Archive for June 2012

Confiuring php from source

There are few steps if you want to compile and configure php from the source code available on php.net website.
1. Download the source code from the site.
2. unzip it to a directory of your choice [for eg. /home/uttam/].
3. go to your shell prompt.
4. run configure with the extension needed to support in php.[for eg. ./configure --with-mysql]
- you may see this type of error while configuring your php.

configure: error: xml2-config not found. Please check your libxml2 installation.
- In this case install libxml2 by using sudo apt-get install libxml2 libxml2-dev


5. You will get a thank you message for using php.
5. run make
6. run make install using command sudo make install.here you will see the following info which tell you directory info of PHP .
Installing PHP CLI binary: /usr/local/bin/
Installing PHP CLI man page: /usr/local/man/man1/
Installing build environment: /usr/local/lib/php/build/
Installing header files: /usr/local/include/php/
Installing helper programs: /usr/local/bin/

7. By default PHP command will be loaded at /usr/local/bin/php directory.you can use /usr/local/bin/php -m to know options and extention available to use with php.

8. Congratulation you have successfully installed PHP.

Traffic exchange script


I will send you on mail all PHP script for create Traffic exchange website.

You need webhost with php and mysql, and mail servis available. 

With Traffic exchange script you can earn money when someone buy credits for exchange traffic.

Example of site you can see on DEMO

If you wan to earn conis go to Earn Cons and click to Surf.

You can add your website (Menu -> Add site) and ather user will surf your website.

You can also find this offer on >> Fiverr<<

HOW TO INSTALL traffic exchange script?

1. upload all files to your domain.

2. setup a new mysql database however you want.

3. import file db.sql into your database using phpmyadmin.

4. open config.php and type in the new database settings that you setup.

5. open your browser and load up your domain

6. login to your site as  admin/password 

7. Change your admin information and continue to adjust site as you want..

If you need any additional help or assistance , contact us!

PHP control statement and logical operator example

This tutorial is not like other PHP tutorial. To understand this tutorial you need to have enough knowledge on PHP control structure such as if, else, if….else etc and PHP logical operators. It gives you some capability to solve complex problem. Real life problem is very complex. For example, if Rahim age is between fifteen and sixteen then we call Rahim is teenage boy. So guys let’s start to write the problem in PHP code.
<? Php
$ Up_years = 20;
$ Low_years = 15;
If ($ up_years <20&& $ low_years> 15)
echo “Rahim is teenage boy”;
?>

We now try to write the problem in another way, if Rahim age is not between fifteen and twenty and also is not between twenty and hundred then we call Rahim is a little boy.
<? Php
If (($ low_years< 15&& up_years >20) && ($ low_years> 20 && $ up_years <100))
echo “Rahim is a little boy”;
?>

If Rahim age is fifteen or twenty then our program print “Now you are teenage”. We can solve it using php logical or operator.
<? Php
If (($ low_years == 15) | | ($ up_years == 20))
echo "Now you are teenage";
?>
It is very enjoyable for us to solve this type of problem. My suggestion is trying to solve different type of problem using logic. I hope you will get better results in PHP programming than others.

Installing PHP 5.2.5

Steps to setting up PHP 5.2.5 :

1. Install PHP :

First, extract the PHP package to “C:\PHP\”(make a new
folder name it as “PHP” and extract files in this folder).
Then make a copy of the file “php.ini-recommended” in
PHP directory and rename it to “PHP.ini”. This is the PHP
configuration file and we'll take a look what's in it
later on.

2. Up graders :


Remove the Old PHP.INI File from Your Windows Directory
If you are upgrading to PHP 5 from an older version, go to

your windows directory, typically “c:\windows”, and
delete any php.ini file that you have previously placed
there.

3. Modifying PHP Configuration File (php.ini) :


Now, open “php.ini” in some text editor. I am using

EditPlus 2” you can choose editor of your choice and
make following changes:

Document Root :

Search for the line that reads “doc_root = ” and replace

it with doc_root = C:/Apache/htdocs” and then search
for “; cgi.force_redirect = 1” and replace it with
cgi.force_redirect = 0” (*document root path in php.ini
should be the same as document root path in httpd.conf
in apache server).

Short Open Tags :


Search for the line that read
short_open_tag = Off” and replace it with
short_open_tag = On” (* it helps to recognise tags like
as start tag for a PHP script).

Magic Quotes :


Similarly, replace “magic_quotes_gpc = Off” with

magic_quotes_gpc = On”(*this allows your input data
to have the backslash (“\”) prefix).

Register Global :


Verify that register_globals is set to Off
register_globals = Off” (*if it is set On, it will allow
to write insecure codes).

Modifying Apache Configuration:

Apache doesn't know that you just install PHP. We need
to tell Apache about PHP and where to find it:

1. Open the Apache configuration file in
C:\Apache\conf\httpd.conf” and add line
PHPIniDir "C:/PHP/" to the top of the file (*this line
indicates the location of php.ini).

2. Add the following lines to the end of the file:


ScriptAlias /php/ "C:/PHP/" (*this line adds script alias

for “cgi-bin”).

Action application/x-httpd-php "C:/PHP/php-cgi.exe"
(*this line tells the server to execute the PHP executable
each time it encounters a PHP script).

AddType application/x-httpd-php-source .phps

(*this line is added so that you can view your php file
source code in the browser window).

LoadModule php5_module "C:/PHP/php5apache2_2.dll"

(*this line tells Apache where to load the dll required to
execute PHP).

If you create a file index.php, and want Apache to load

it as the directory index page for your website, you will
have to add another line to the "httpd.conf" file. To do
this, look for the line in the file that begins with
"DirectoryIndex" and add "index.php" to the list of files
on that line. For example, if the line used to be:
DirectoryIndex index.html” change it to
DirectoryIndex index.php index.html”.

Now restart Apache for the changes to take effect
(Start >Programs >Apache HTTP Server 2.2.6 >

Control Apache Server >Restart) .

Open the folder “C:\Apache\htdocs” and delete all the
existing items from it.

To check if everything is okay create a new file, name

it as “test.php” and put it in document root directory
(C:Apache\htdocs). The content of this file

is “< *? phpphpinfo(); *?>” (remove * sign before ?
to get actual content of this file).

phpinfo() is the infamous PHP function which will spit
out all kinds of stuff about PHP and your server
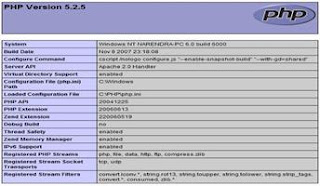
configuration. Type “http://localhost/test.php” on your
browser's address bar and if everything works well you
should see something like this:


also visit:http://webdeeksha.blogspot.com/


Working with memcached

memcached is a general-purpose distributed memory caching system used to speed up dynamic database driven websites by caching data in RAM to reduce the number of times an external data source to be read.

Here is how memcached can be useful.The system uses a client server architecture. Server maintains associative array in key value pair. the clients populate this array and query it. Keys are up to 250 bytes long and values can be at most 1 MB size. by default server runs on 11211 port. A client should be installed in order to access memcached data. client can connect to multiple server by adding new server to it's pool. gettting data from memcached there are several methods to use memcached. yo can go to official site for more information on memcached.

Using memcached from a script. [I've used PHP in example.]

1. Memcached class should exist if memcached client is installed properly. Create an object of memcached.

                  $obj = new Memcached();
    if object created means memcached service is running. If not then you can start the service from command prompt.using command  svc -u path/to/memcached/ [eg:  /usr/local/memcache/bin/memcached ]

2. Add the server to the pool.
                $obj->addServers($servers); [$servers = array( '172.18.1.69', 11211) where 1st param. is IP of the server and second is port.]

3 Now you can use different methods to add/fetch memcached data. [example get($key),set($key,$value)]. for more information visit php.net site and search for memcached based function.


Checking memcache log.

1. Go to memcashed directory  /service/memcached

2.write the following command to get log
tail -f log/main/current | tai64nlocal


Using telnet to connect to memcache server.

1. telnet server_IP port [telnet 127.0.01 11214]

Once connected, you can check if memcache key is set, by typing  get memcache_key_name to get the memcached data for the key memcache_key_name and press enter. You can also set and delete key using set and delete.

Well that's all folks. We'll see membase in the next session.


PHPCamp 2008 learning

This was the first PHP camp happening in india pune.I have just returned after attending un-organizing India’s biggest php camp.I learned a lots.I shared my knowledge of PHP security there.Overall I enjoyed this camp organized @ persistent system, was attended by over seven hundred interested intellectuals. Nice event, nice ppl..

Actual I was in search of such kind of platform where we all can share our knowledge and our expertise.I think this type of camp should continue for the years ahead....
want to download my presentation on PHP security ?? click here

Control structures in php: require()

The require() statement includes and evaluates the specific file.
require() includes and evaluates a specific file. Detailed information on how this inclusion works is described in the documentation for include().
require() and include() are identical in every way except how they handle failure. They both produce a Warning, but require() results in a Fatal Error. In other words, don't hesitate to use require() if you want a missing file to halt processing of the page. include() does not behave this way, the script will continue regardless. Be sure to have an appropriate include_path setting as well.

Example: Basic require() examples

<?php

require 'prepend.php';

require $somefile;

require ('somefile.txt');

?>


Note: Prior to PHP 4.0.2, the following applies: require() will always attempt to read the target file, even if the line it's on never executes. The conditional statement won't affect require(). However, if the line on which the require() occurs is not executed, neither will any of the code in the target file be executed. Similarly, looping structures do not affect the behaviour of require(). Although the code contained in the target file is still subject to the loop, the require() itself happens only once.

Note: Because this is a language construct and not a function, it cannot be called using variable functions

Warning:

Windows versions of PHP prior to PHP 4.3.0 do not support accessing remote files via this function, even if allow_url_fopen is enabled.


CodeIgniter 2.1.0. / Hello World in CodeIgniter 2.1.0.


Hello World in CodeIgniter 2.1.0.

Steps:
1. Open http://codeigniter.com/downloads/
2. Download Current Version CodeIgniter 2.1.0.
3. Unzip CodeIgniter_2.1.0
File structure of CodeIgniter_2.1.0
- application
- system
- user_guide
- index
- licence

4. Create file called hello.php in your application/controllers folder & paste following code.

<?php
class Hello extends CI_Controller
{
function index()
{
echo 'Hello world!';
}
}
?>

5. Go to http://localhost/codeigniter/index.php/hello
6. You will get output Hello world
7. Update hello.php with following code

<?php
class Hello extends CI_Controller
{
function index()
{
echo 'Hello world!';
}

function test()
{
echo 'Second hello world!';
}
}
?>

8. Go to http://localhost/codeigniter/index.php/hello/test
9. You will get output 'Second hello world!
10. Using .htaccess and mod_rewrite you can remove the 'index.php' from url,
ie. http://localhost/codeigniter/hello or http://localhost/codeigniter/hello/test

11. Open wamp > bin > apache > apache2.2.8 > conf > httpd.conf
12. Search for LoadModule rewrite_module modules/mod_rewrite.so and uncomment it (Remove #)
#LoadModule rewrite_module modules/mod_rewrite.so to LoadModule rewrite_module modules/mod_rewrite.so

13. Save httpd.conf file & Stop All Services of WAMP & then Start All Services of WAMP
14. Create a “.htaccess” file in the root of CodeIgniter directory  (where the application, system, user_guide directory resides), open the file using your favorite text editor, write down the following script and save it:

RewriteEngine on
RewriteCond $1 !^(index\.php|resources|robots\.txt)
RewriteCond %{REQUEST_FILENAME} !-f
RewriteCond %{REQUEST_FILENAME} !-d
RewriteRule ^(.*)$ index.php/$1 [L,QSA]

15. Go to http://localhost/codeigniter/hello or http://localhost/codeigniter/hello/test

Installing Apche 2.2.6

Installing apache is easy. Just double click on the icon to run
the installation wizard Click next until you see the Server
Information window. You can enter “localhost” for both the
Network Domain” and “Server Name”. As for the
administrator's email address you can nter anything you
want.


Click the Next button and choose “Typical installation”,
Click Next” one more time and choose “C:\Apache\
as your installation directory instead of
C:\Program Files\Apache Software Foundation\Apache2.2\
which is the default installation directory(*Program Files in
Vista is locked by Microsoft Corporation). Click “Nextthen
Install” to complete the installation process. Click the
Next button and choose “Typical installation”. Click “Next
one more time and choose “C:\Apache\” as your installation

directory instead of
C:\Program Files\Apache Software Foundation\Apache2.2\
Which is the default installation directory (*Program Files in
Vista is locked by Microsoft Corporation). Click “Next” then
Install” to complete the installation process.

To see if your Apache installation was successful open up your

browser and type http://localhost/ in the address bar. If
everything is Okay, you should see a message like this:

It works!

First PHP Script

Hello World php

This is the most common thing you do when you learning PHP. first and foremost you need to know that php blocks starts with . Similar to Html Hello Which makes Text bold like this Hello. Php blocks can be placed anywhere in your Web documents, aslong as your your php file is .php extension.

Let's create our first php file. Open test editor such as Notepad.. or any other web editor programs such as dreamweaver. but avoid using MS word for god sake... duh!
Now write the following document.

By the way.. codes above are in gif image format! Just because i don't want you to copy and paste codes in your text editor, you need to type everything yourself.

Save this file as "hello.php" and upload or place it in your testing folder or your web sever.
To execute this script, type something like this in your browser address bar :

http://www.yoursite.com/testfolder/hello.php
or if it's in your local site :
http://localhost/testfolder/hello.php


Adding comments on the Code

Adding comments on your php code is a good habit, this way you'll always keep track of bugs & errors that continue to show up all the time in developers browser.

Go on test it.. you'll not see those comment lines or blocks on the code.
This comment lines are commonly used by all php developers, because it reduces the complexity of the code. Imagine 1000 lines of php code without comments on it.. it would be difficult task for developers to locate the bugs.. with comments on it, it is easy to figure out, what went wrong.

Well that's it, we will talk about if and else statements on next chapter.

Declaring variable and method in PHP class


We knew  that variable is an object state. We need to declare all object state within PHP class.  We want to declare a variable within class such this way

class Myclass{
public $variable;
}

Add string in that variable

class Myclass{
public $variable= “Storing Variable Data”;
}

Declaring Method::

A method is an object behavior. Object behavior defines object task. So we want to print the variable data in PHP method. To do this at first write function then write method name with a pair of parenthesis () and body with curly braces {}
class Myclass{
public $variable=”Storing variable data”;
public function display_variable()
{
// method body
}
}

Access Modifier::

PHP access modifier used to take control of the class or class properties. At this moment we only consider public and private access modifier others will be discussed later.
public modifier—the field is accessible from all classes.
private modifier—the field is accessible only within its own class.
This access modifier used to prevent unauthorized access in PHP class. It is core concept of class encapsulation. 

Building a RESTFUL Application using PHP CodeIgniter


One of the most common demands among clients today is, integration of REST based web service in their web application. In fact this demand seems quite growing, as the demand for mobile application are increasing. Since Mobile applications are device or OS specific, the REST architecture comes to our rescue under such conditions, for the server side implementations.

What is REST ?

REST stands for Representational State Transfer . For a more in depth understanding visit: IBM Library or Wikipedia. In very simple terms, In REST we have basically two broader actions Request and Response. Client will send the request to the REST API in a data format (i.e, JSON, XML ) that is acceptable by the API. Similarly, a Response will be generated by the API in a pre-defined(i.e, JSON, XML ) format. For the sake of simplicity, our response and request format will be in JSON. You can easily modify it to suit your particular requirements.
According to the REST guidelines, we have to make explicit use of the HTTP methods to make request to a REST based API. So the requests for basic CRUD operation in any application can be mapped to the HTTP methods in this way:
  • POST method to Create or Add new data.
  • PUT method to Update an existing data.
  • GET method to retrieve an existing data.
  • DELETE method to remove or delete an existing data.

Building the REST ?

We are going to use the above guidelines in order to build a very basic type of rest server. Let us name this file as Rest_service.php, and we will place it in /application/libraries folder.
class Rest_server extends CI_Controller {
/*
* Holds the type of request made by the server
*
* @var string
* @access protected
* @since 0.0.1
*/
protected $_request_type;

//----------------------------------------------------------

/**
* Constructor Method
*
* @since 0.0.1
* @version 0.0.1
*/
public function __construct() {
parent::__construct();
$this->_request_type = $this->_check_request_method();
$this->_call_requested_function();
}

//----------------------------------------------------------

/*
* Checks which method has been used to make the request.
*
* @version 0.0.1
* @since 0.0.1
*/
function _check_request_method() {
$method = strtolower($this->input->server('REQUEST_METHOD'));
if (in_array($method, array('get', 'delete', 'post', 'put'))) {
return $method;
}
return 'get';
}

//----------------------------------------------------------

/**
*
*/
function _call_requested_function(){
#processing the arguments based on the type of request
switch ($this->_request_type) {
case 'get':
#converting the passed arguments into an associative array
$data = $this->uri->uri_to_assoc(4);
break;
case 'post':
$data = file_get_contents("php://input");
$data = json_decode($data);
break;
case 'put':
$data = file_get_contents("php://input");
$data = json_decode($data);
break;
case 'delete':
$data = file_get_contents("php://input");
$data = json_decode($data);
default:
break;
}

#inserting the data entered by the user in the POST array
if (!empty($data)) {
foreach ($data as $key => $value) {
$_POST[$key] = $value;
}
}


#reading the object name for which the call is made
$object_name = $this->uri->segment(3);
$controller_method = $object_name . '_' . $this->_request_type;

#calling the target function
call_user_func(array($this, $controller_method), $arr_argument='');
}

}


This class will handle all the requests send to the Rest service and will call the appropriate methods to perform the requested operation.

To view or download the entire class visit this link

PHP Bangla Online shop video tutorials

Today I want to share with you PHP online shop Bangla video tutorials. This tutorial not mine, I just collect it from Zakaria Sir. From this tutorial you can easily understand how to build a subtle online shop. It is a simple online shop but from this tutorial you can learn many things with professional way.
First off all you need to download a codec and then install it of your personal computer. So guys here the link for those tutorials. To download tutorials, click on the link below and then click skip add. I hope you will enjoy all tutorials from Zakaria Sir thanks.
After completing your download try to write every line of code and then try your best to understand each code. If you don't understand any line of code then make sure your comments. I try my best to solve your problem. 

Email Validatation in Javascript


Email :

PHP arithmetic operators

When you were start your first math learning, I am sure you have used + sign, - sign, * and / sign. These sign are used in PHP as a arithmetic operator. Different kinds of PHP arithmetic operators are + operator, - operator, * multiply operator, / division operator, % modulus operator. Here we describe its clearly.

(+) Addition Operator: Using this operator we can add two value such that $a + $b or 12+15=27.
(-) Subtraction Operator: Using this operator we can subtract two value such that $a - $b.
(*) Multiply Operator: We call * sign is multiply operator in PHP. Multiply operator is used for multiplication such that 12*2=24.
(/) Division Operator: To find quotient we use PHP division operator. For an example, 12/2=6.
(%) Modulus Operator: We find remainder from two variable we use PHP modulus operator. For an example, 12%2=0.

PHP Arithmetic Operator Example:  Let's try an example where we have used all PHP arithmetic operators.
<?php
echo (2+8); // Addition
echo "<br>";
echo (9-3); // Subtraction
echo "<br>";
echo (2*9); // Multiplication
echo "<br>";
echo (6/2); // Division
echo "<br>";
echo (6%2); // Modulus Operation
?>
The outputs are 10,6,18,3,0. Try to change our code and see what will be the output.

UI tools

There are lots of tools available to help you document and design your web site. It seems that we all need a wireframing or prototyping tool at our fingertips.

It has covered the biggies: OmniGraffle Pro, Visio, Axure RP Pro, iRise Pro, Balsamiq Mockups, ConceptDraw Pro, etc… but he also goes into detail on a few well-known tools that can be used for wireframes and prototypes such as Keynote, PowerPoint, Adobe Fireworks, Adobe Flash and plain ol’ XHTML.

I've used Axure RP Pro and it's amazing to develop wireframe of software/website/web based tools.